

Reveals
Using reveal depths to your advantage in Passivhaus design

Reveals are a fun, quirky little input in your PHPP model. They may not drastically affect your results but playing with the reveal depth can help to reduce your cooling demand at minimal effect to your space heating demand. A neat little hack if you’re concerned about overheating.
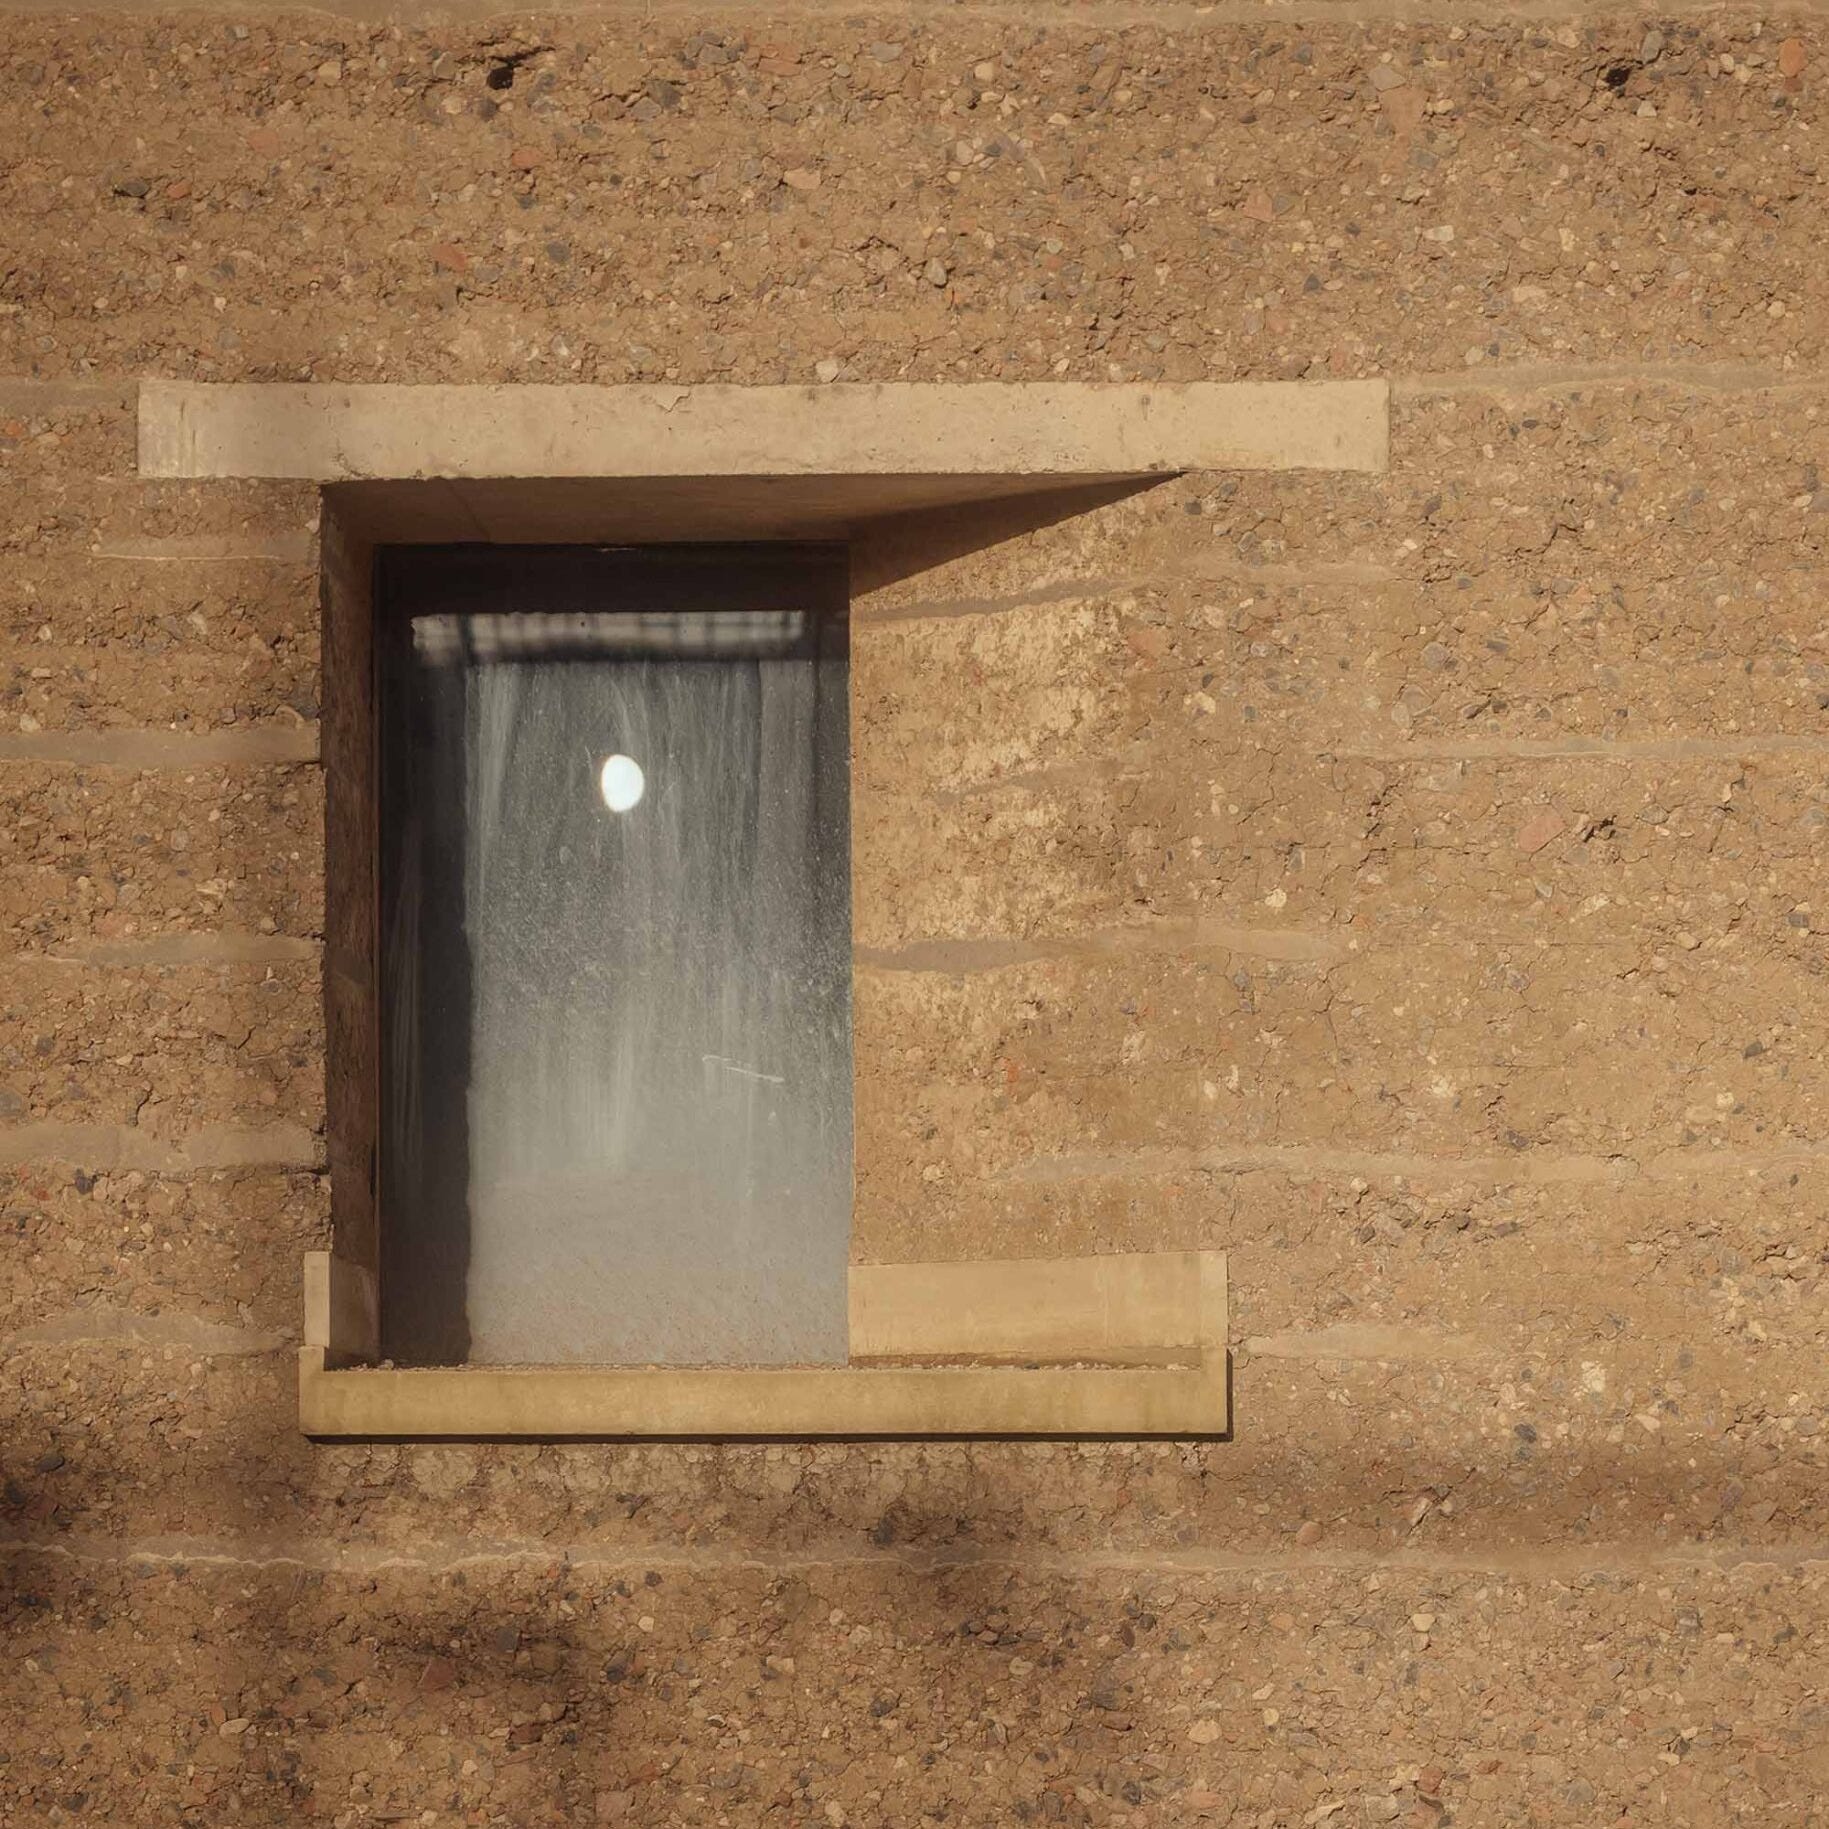
If you’ve designed your reveals badly there is a risk of failing some of the additional, little known, Passivhaus criteria. But design them right and you can make them a beautiful architectural feature. The image above is one of my favourite examples, an asymmetric reveal! What an absolutely stunning idea!

There are two main reasons why reveals are important: thermal comfort and solar design.
Thermal comfort
One of the lesser known Passivhaus criteria is interior surface temperatures. The extended Passivhaus building criteria states that “the interior surface temperatures of standard cross-sections of walls and ceilings may not be more than 4.2K below the operative indoor temperature.
“In the case of windows, this requirement must be complied with for the radiation temperature at a point located centrally at 0.5m in front of the window (whole window element, possibly made up of more than one pane).”
All sounds a bit confusing? It did for me too, but we can break it down to a good design principle. We want to maintain the temperature of the inner face of the envelope. The reason for this is radiant asymmetry, how the body perceives heat (we’ll come onto this in another article). Ideally it shouldn’t really drop more than 4.2K below the operative temperature. So how can we do this?
One of the ways we can maintain this temperature around the window is by locating it in the right position.
If you look at your fabric, you should be able to identify which parts of the assembly are doing the heavy lifting (thermally at least). The rate of change of the temperature across the insulation layer is going to be the greatest. Looking at it super simplistically we can assume it goes from external temperature to 20°C from the outside of the insulation to the inside. If we look at the window frame we can do the same. The outside of the frame will be the external temperature and the inside of the frame will be 20°C. So, what can we do with this information?
If we want to maintain the internal surface temperature we want to try line up the internal line of the window frame with the internal line of the insulation. This way we can make sure the internal surface temperature is going to be pretty constant between the two parts of the thermal envelope.
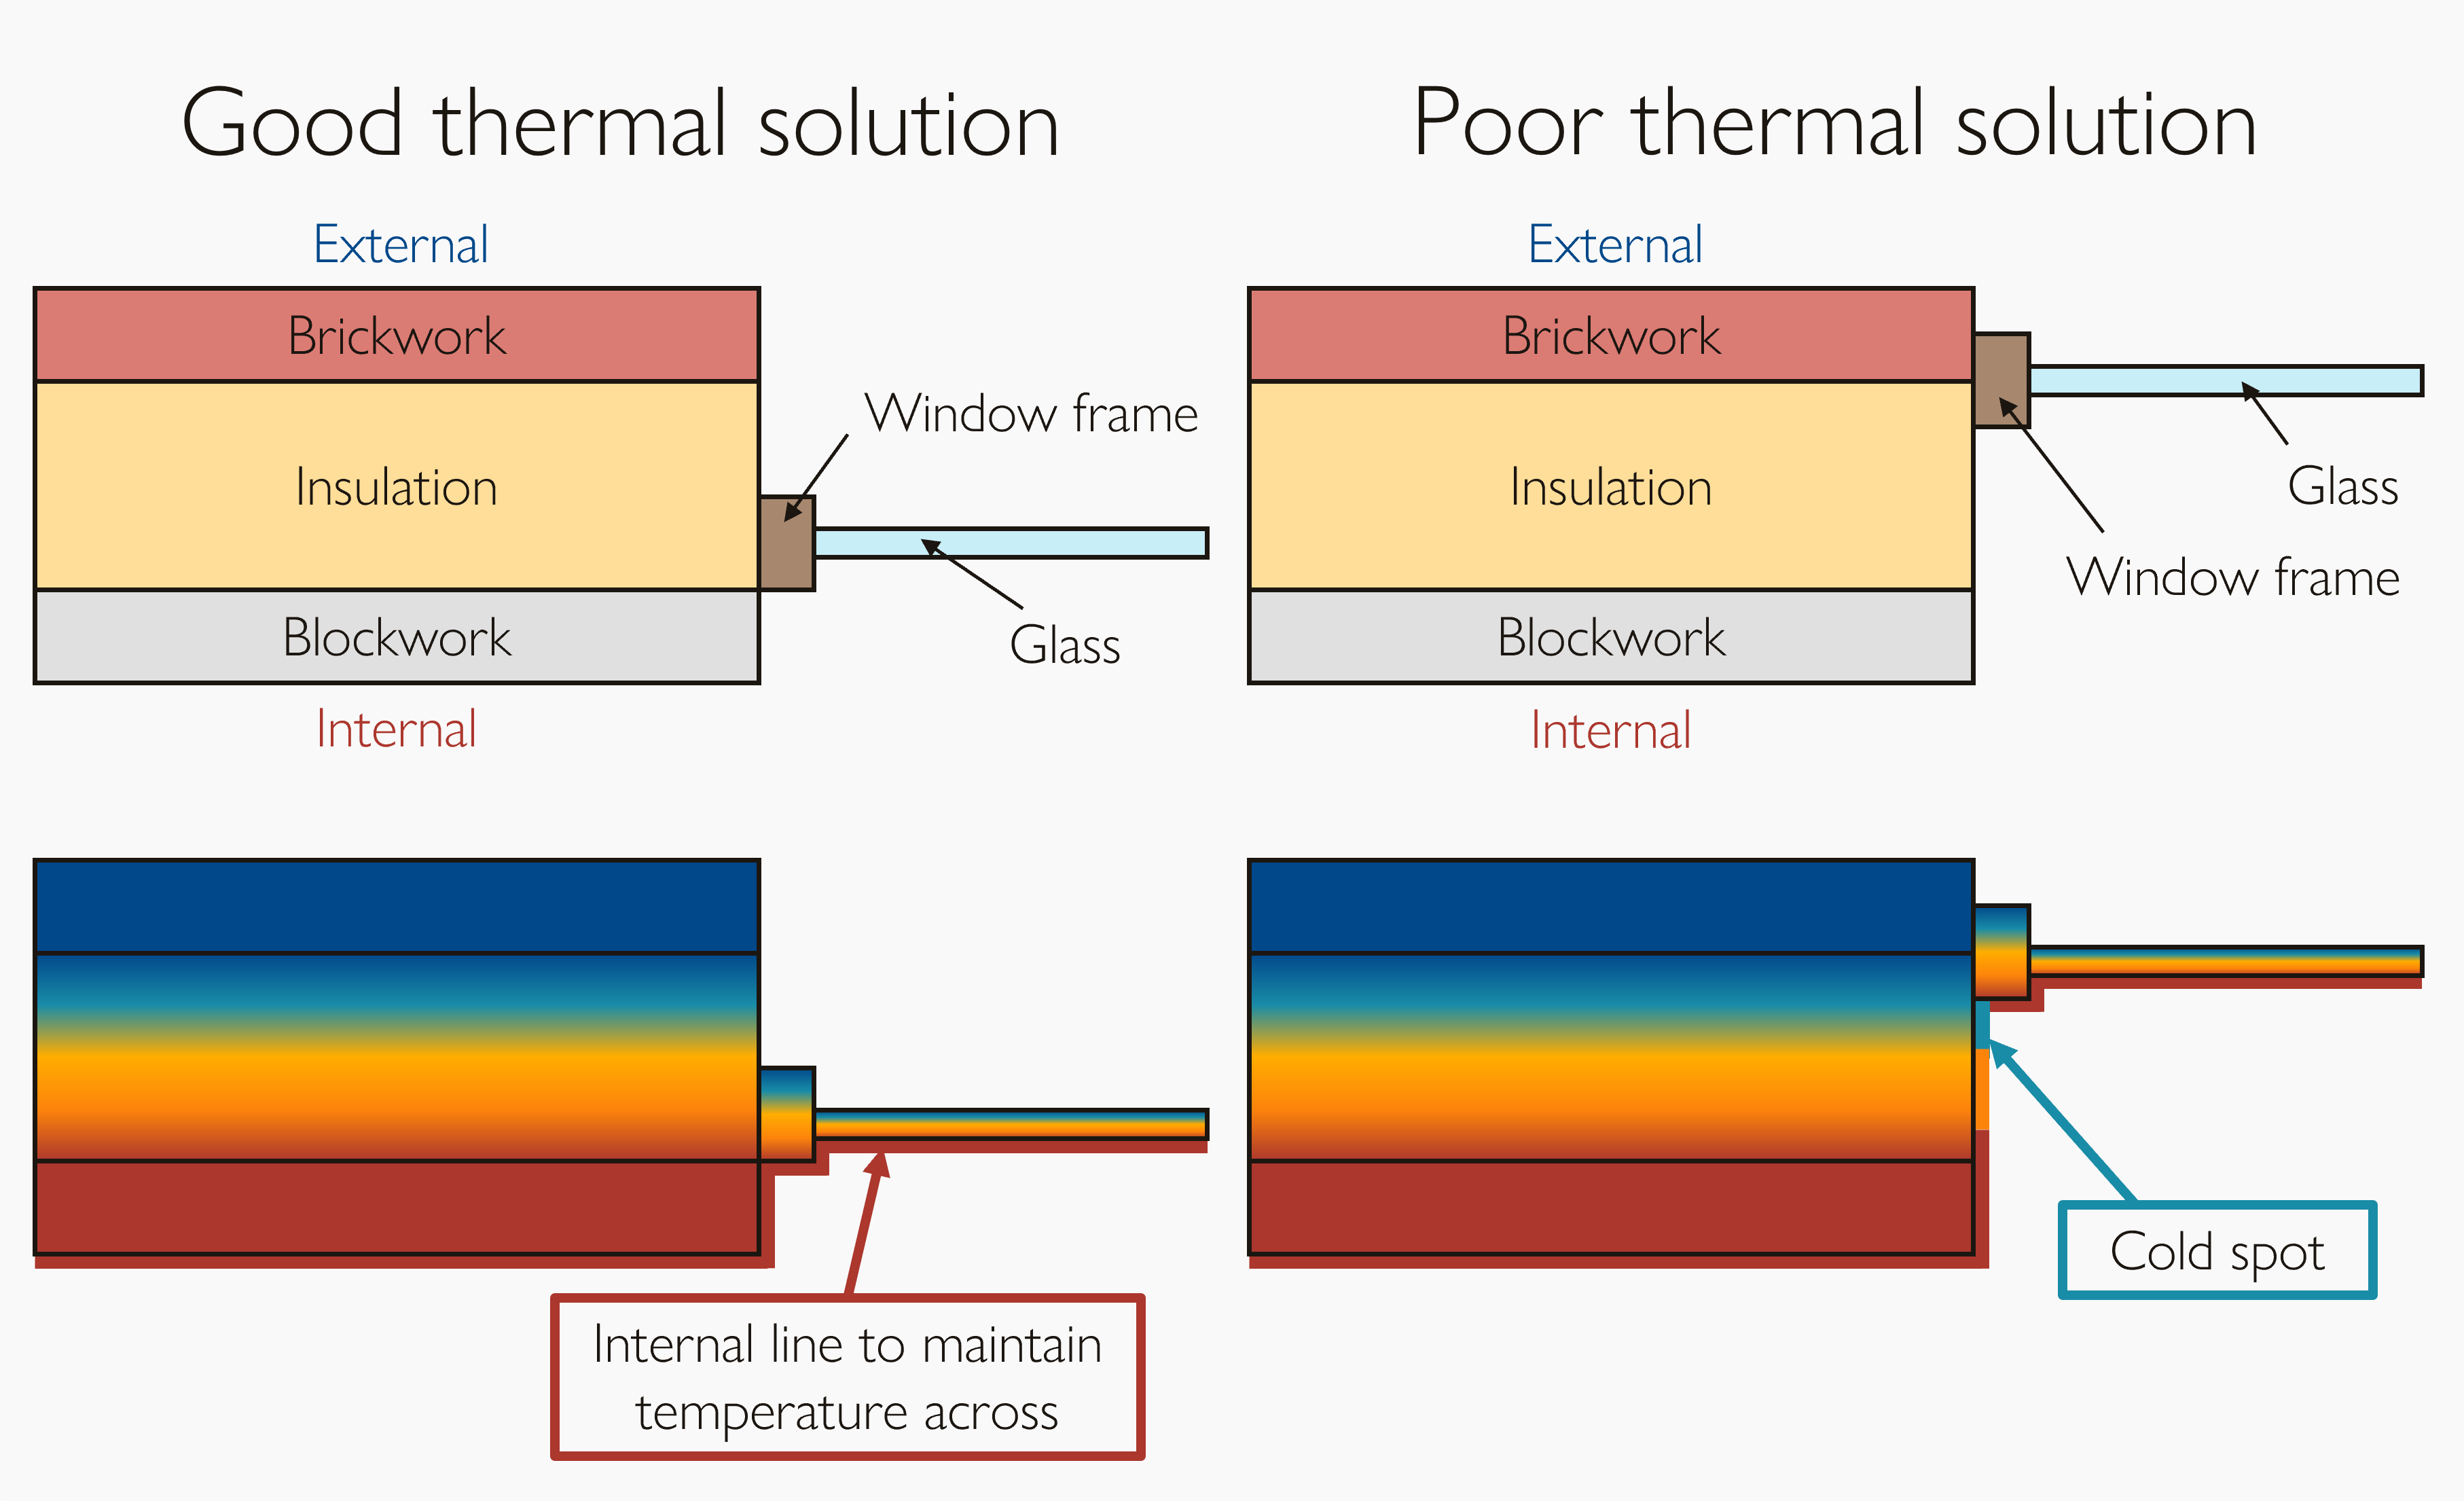
Don’t worry, this doesn’t have to be perfect, this is more of a guidance of the ideal place to locate your window. There are numerous other factors that come into play but this is close to the thermally optimal point.
Solar design
Reveals are also great for optimising for solar design because they act as shading objects. The amount of radiation we get through a window is dependent on several factors, including reveals.
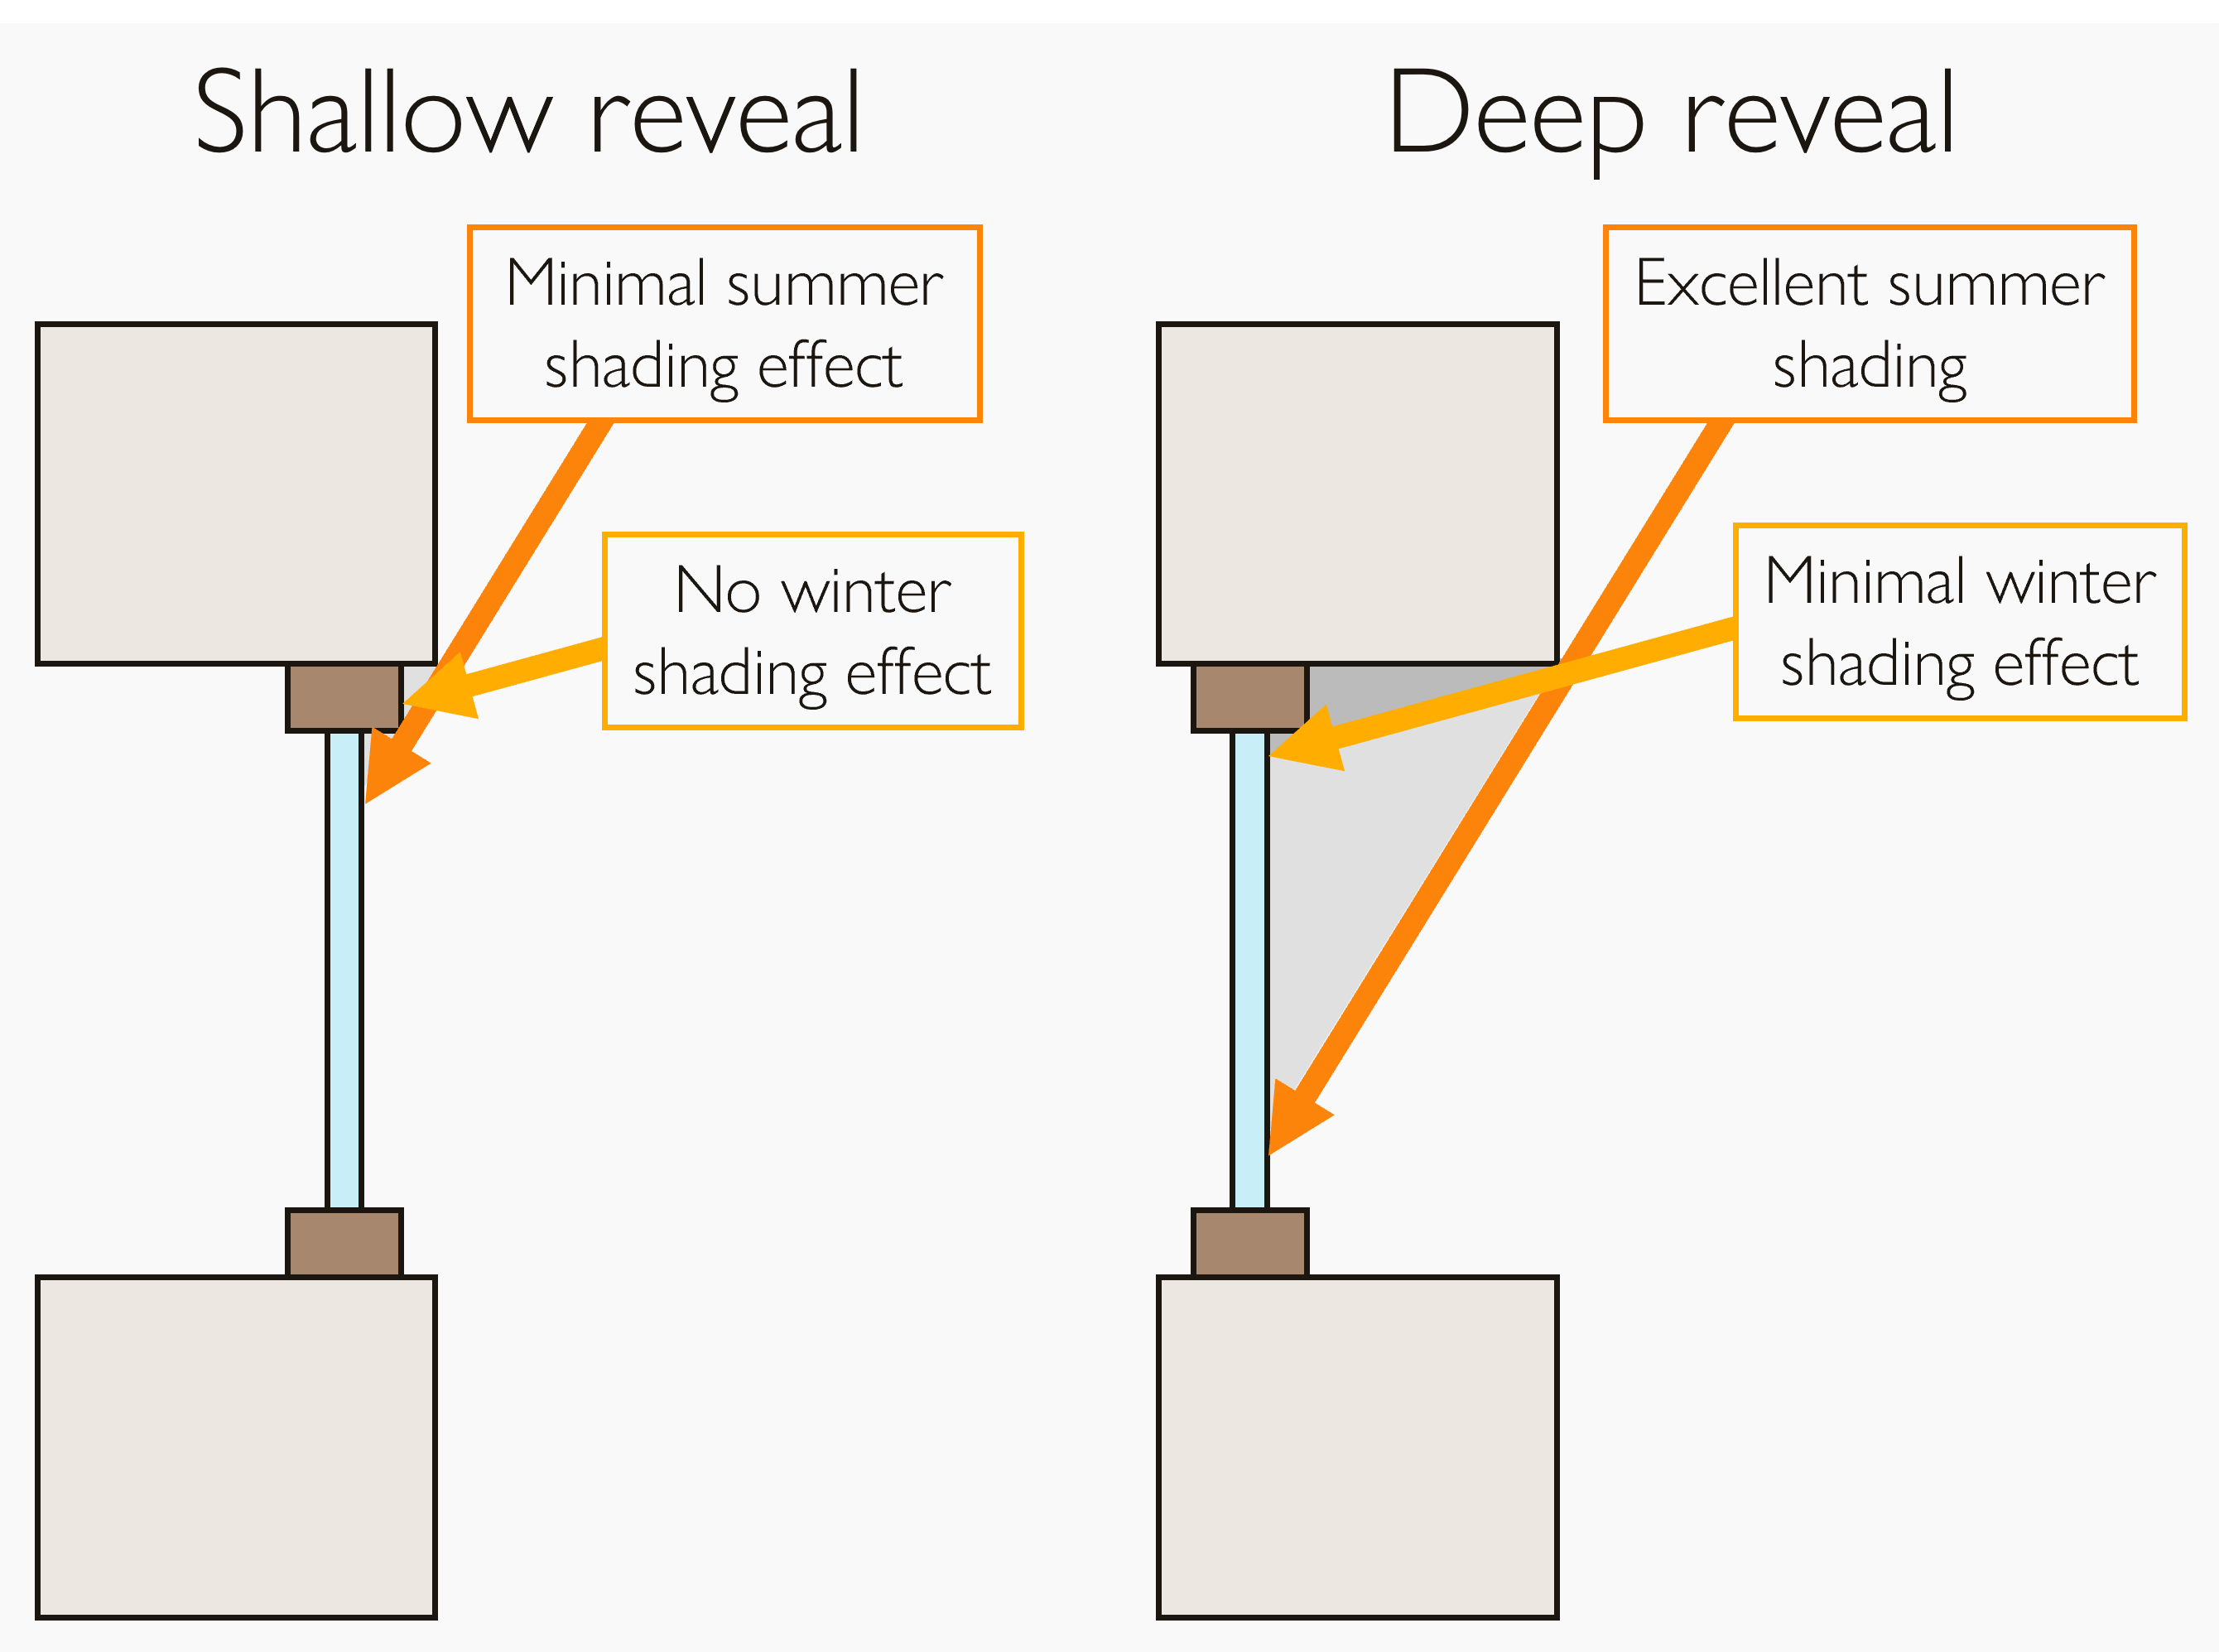
Since solar gains often contribute about 1/3rd of the heat to a Passivhaus, we want to make sure that we let as much solar energy into the building in winter to reduce our space heating demand as much as possible. But in summer we want to avoid solar gains as the energy will increase the risk of overheating the space.
A shallow reveal has next to no shading effect however a deep reveal can block incoming summer solar radiation whilst having minimal effect on winter shading; a real win for solar design in temperate climates.
It’s worth noting that solar design is very dependent on the climate and latitude. It’s a multivariate problem which should balance daylighting and comfort with climate. We’ll touch on this subject in numerous other articles, but we’ll focus on how reveals can be used here.
The shading impact is the main consideration when it comes to our PHPP modelling of reveals, however the thermal losses will come up when modelling your thermal bridges

A reveal is the depth of the glass in relation to the outer face of the façade. It creates a shading effect that reduces the amount of solar gain through a window. It is a geometric measurement, typically entered as two dimensions, in meters, in PHPP: the reveal depth; the distance between the edge of the glazing and the edge of the reveal.
Let’s have a look at how to measure and model it in your Passivhaus design.

For most Passivhaus designs, from an energy perspective, modelling reveals is one to leave until technical design.
There are a few exceptions to this:
Buildings with a cooling demand
Buildings at risk of overheating
Locations with strict planning limitations
If your building is likely to need cooling or is at risk of failing the overheating criteria pushing your architect to consider deep reveals is a smart move at concept stage. You’ll be able to mitigate a fair bit of risk and reduce your cooling load with simple solar design.
The exterior form of the building is often heavily regulated in planning processes. Suddenly changing a design to have a deep reveal can require an update to the planning application, a hassle we want to avoid. Broaching the subject at concept stage, before a planning application is submitted, is also a good idea.
Adding a big reveal could lead to a 15% reduction to cooling demand or overheating risk. This comes at a smaller penalty of a 5% increase in space heating demand or 1% increase in heating load.
Clearly it’s a bit of a balance so it’s one we’d typically like to finetune at technical design. But it may be that you need to lock in your reveal depth at an early stage for planning purposes, so consider the climate your building is in and whether the cooling demand reduction is needed at the smaller cost of an increased space heating demand.

The key part of the process is measuring the reveal depth and the distance from the glazing edge to the reveal. We only need to measure the reveal at the head of the window and the jambs because the sill will have next to no shading effect with the sun only ever shining above the horizon.
To do this we need to define two points for each side of the frame. The first is the edge of the glazing, this is where the glass meets the frame. The second is the edge of the reveal. For most situations this is quite intuitive however you can get weird cases such as the example below. If in doubt I would always use the first point of contact on the fixed façade you get fanning a straight line out from the horizontal at the centre of the window towards the edge of the window.
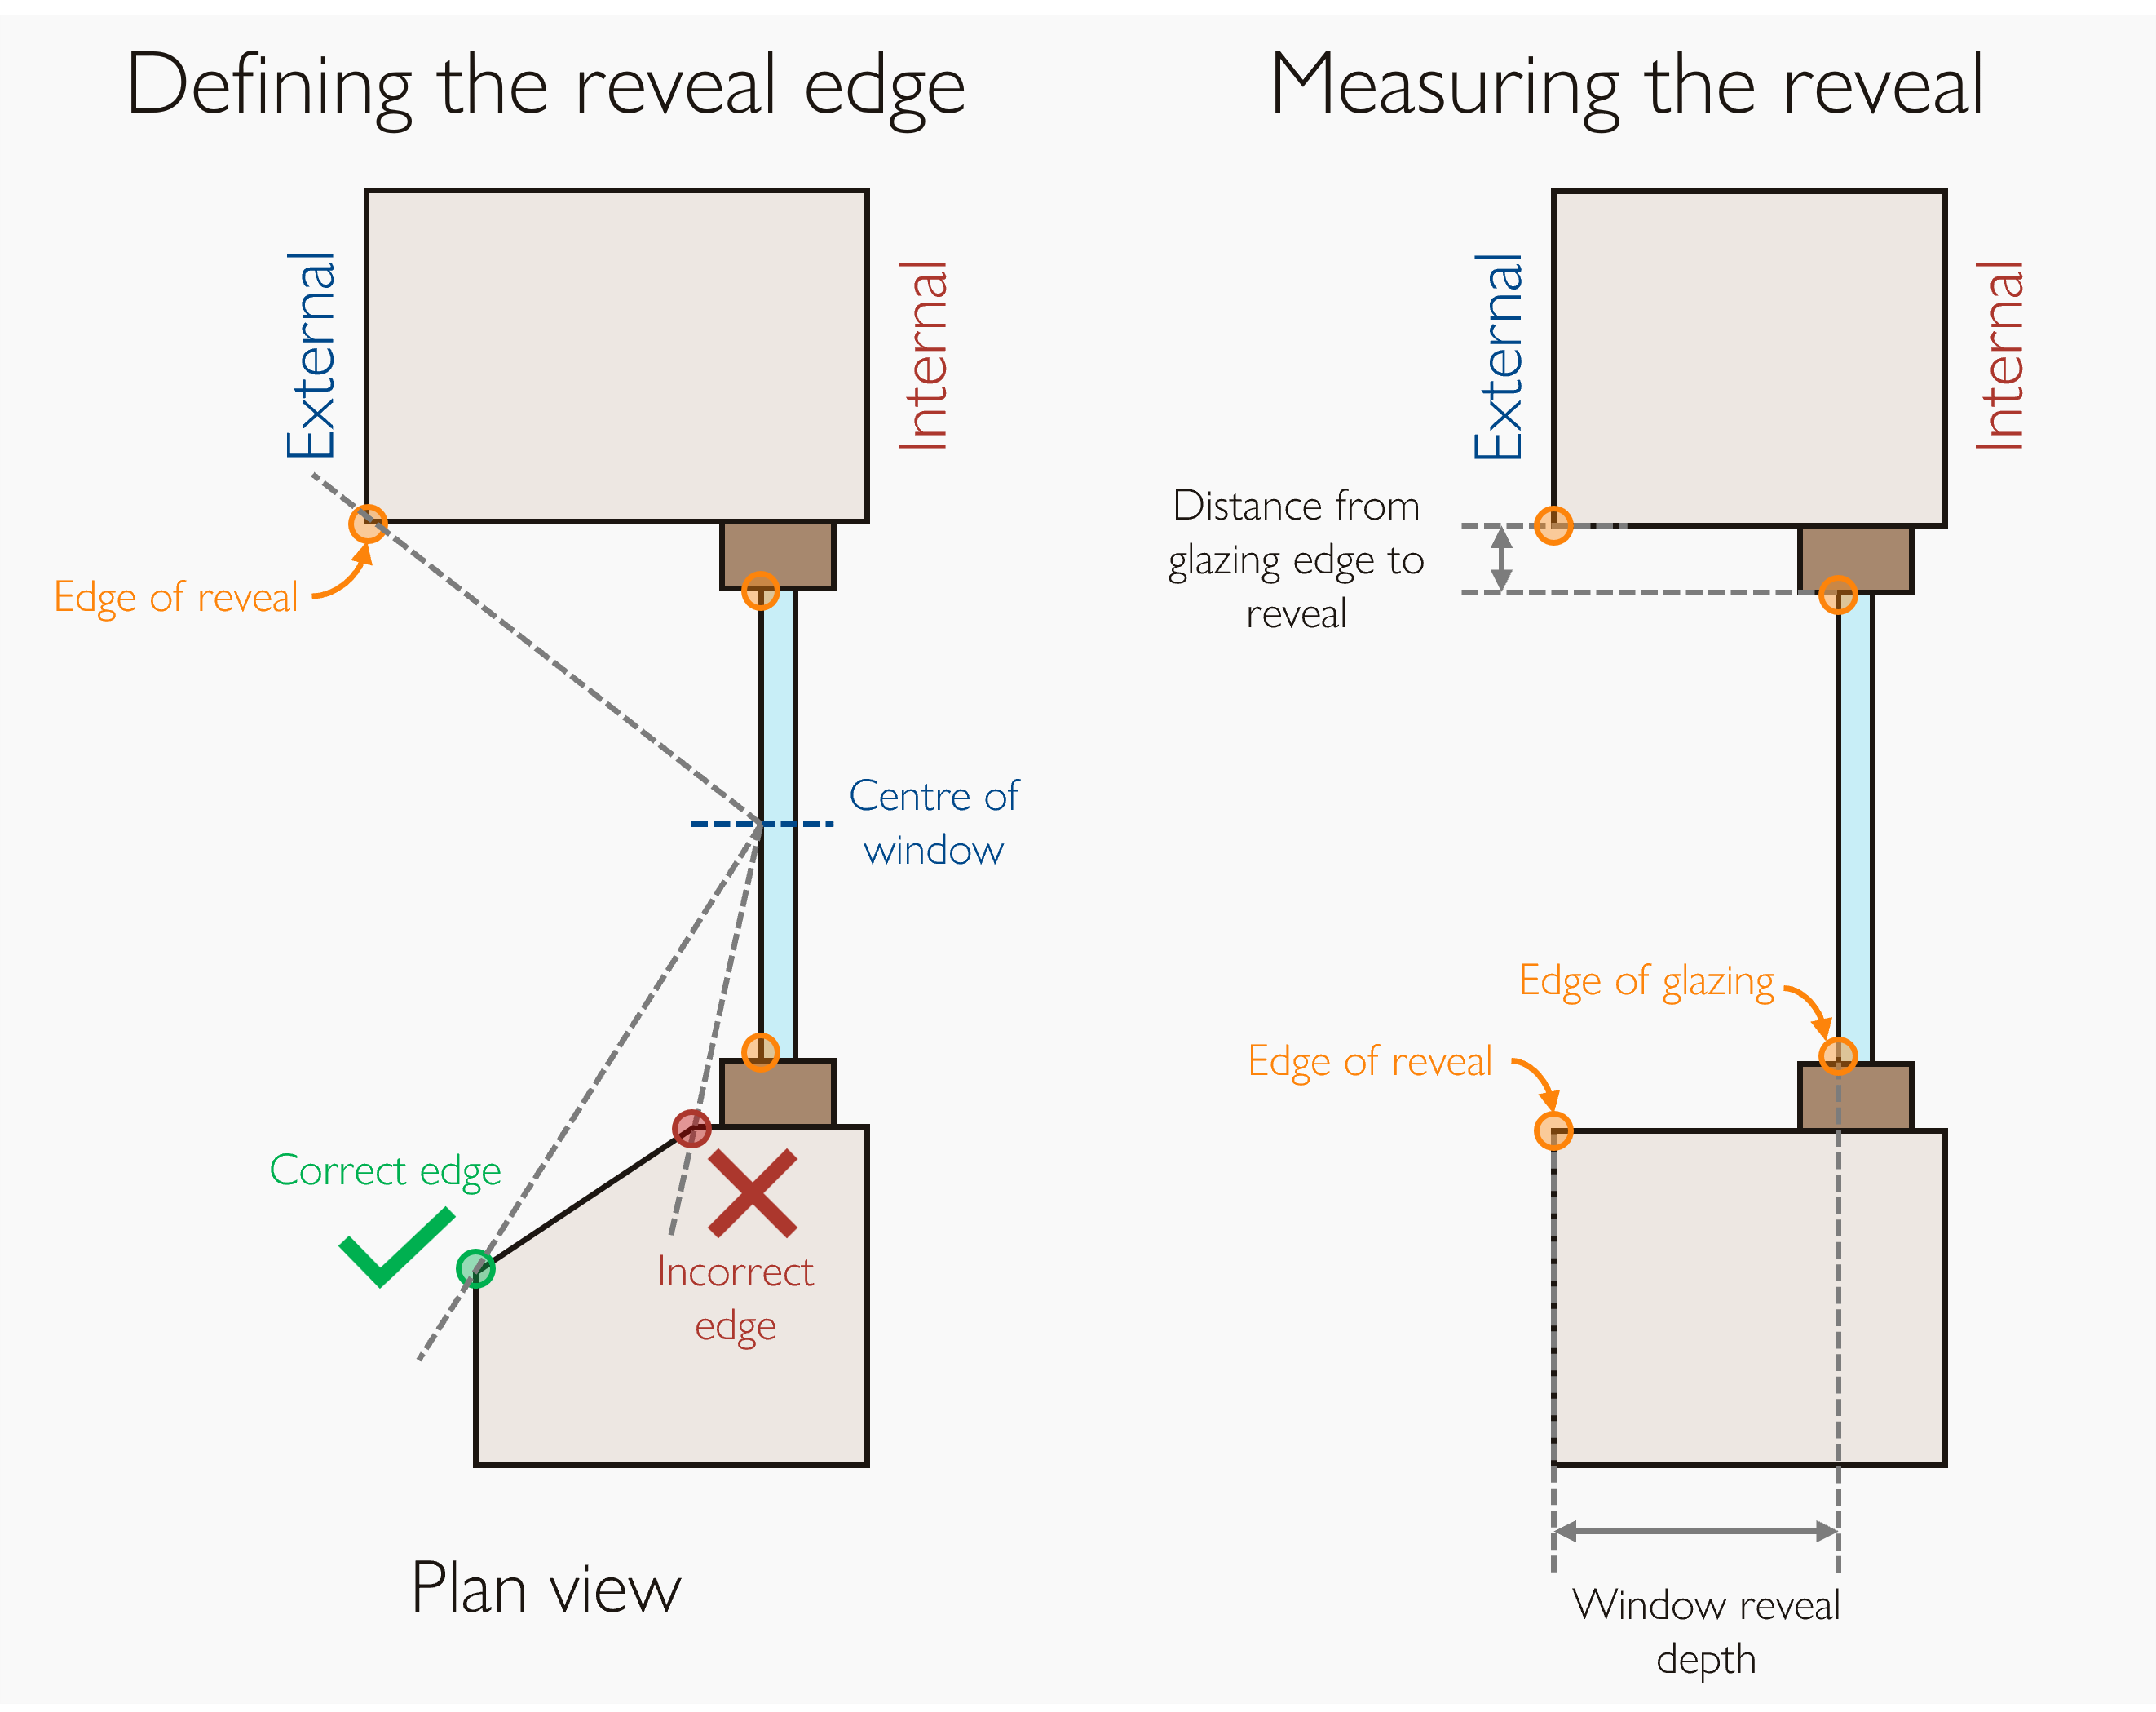
The second step is to measure the distances between these two defined points. You will need the window reveal depth: the distance on plan (the horizontal) between the two points; and the distance from the glazing edge to the reveal: the distance on elevation (the vertical) between the two points.
Note: you will need the horizontal and vertical measurements even for windows installed in a non-vertical surface, such as your Velux windows. The frame of reference is the horizontal not the plane of the window.
When you measure these distances you may be asked for a markup for each window type by your certifier. I would recommend marking up these measurements on an architectural section where you will easily be able to see them. We’ll come on how to do a markup in a future article.
Once you have these measurements for each part of your window frame, we can go about adding them to your PHPP model.

There are two ways we can go about adding reveals to our energy model and each has its pros and cons.
If you are using DesignPH, the easiest way to model reveals is to add them into your DesignPH model. This is great for keeping all geometric information in one place. This is way more important than you might realise. I’ve worked on projects where I’ve run small updates throughout the design process, this was carnage trying to keep on top of what I had modelled and what I hadn’t. Having all geometric updates in one place can save you the hassle of trying to work out what you’ve updated and what you haven’t. Just one look at the DesignPH model and you can see where you are.
However, this comes with some flaws. If you need to change your reveal depth it involves a rerun of shading calculations. Just a minor tweak can lead to hours of simulation time if you have a complex model.
There is also the minor downside of limited flexibility. Now this isn’t something to worry about for most projects but if you have non-symmetrical reveals you might not be able to model them in DesignPH.
Let’s dig into the two methods.
Method 1: DesignPH
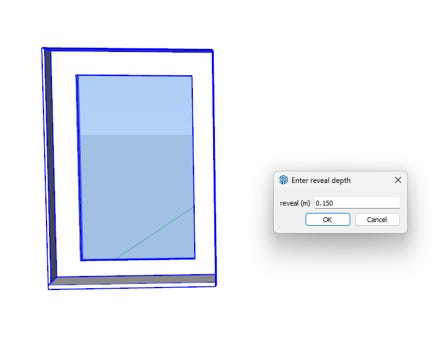
Setting the reveal depth is remarkably easy in DesignPH. All you need to do is right hand click on the window and at the bottom of the pop-up menu there is an option to ‘Modify window reveal depth’. If this option isn’t available double check you have DesignPH launched.

This will launch a box in which you can drop in your reveal depth (in meters).
Here’s a before and after so you can see what happens to your model:
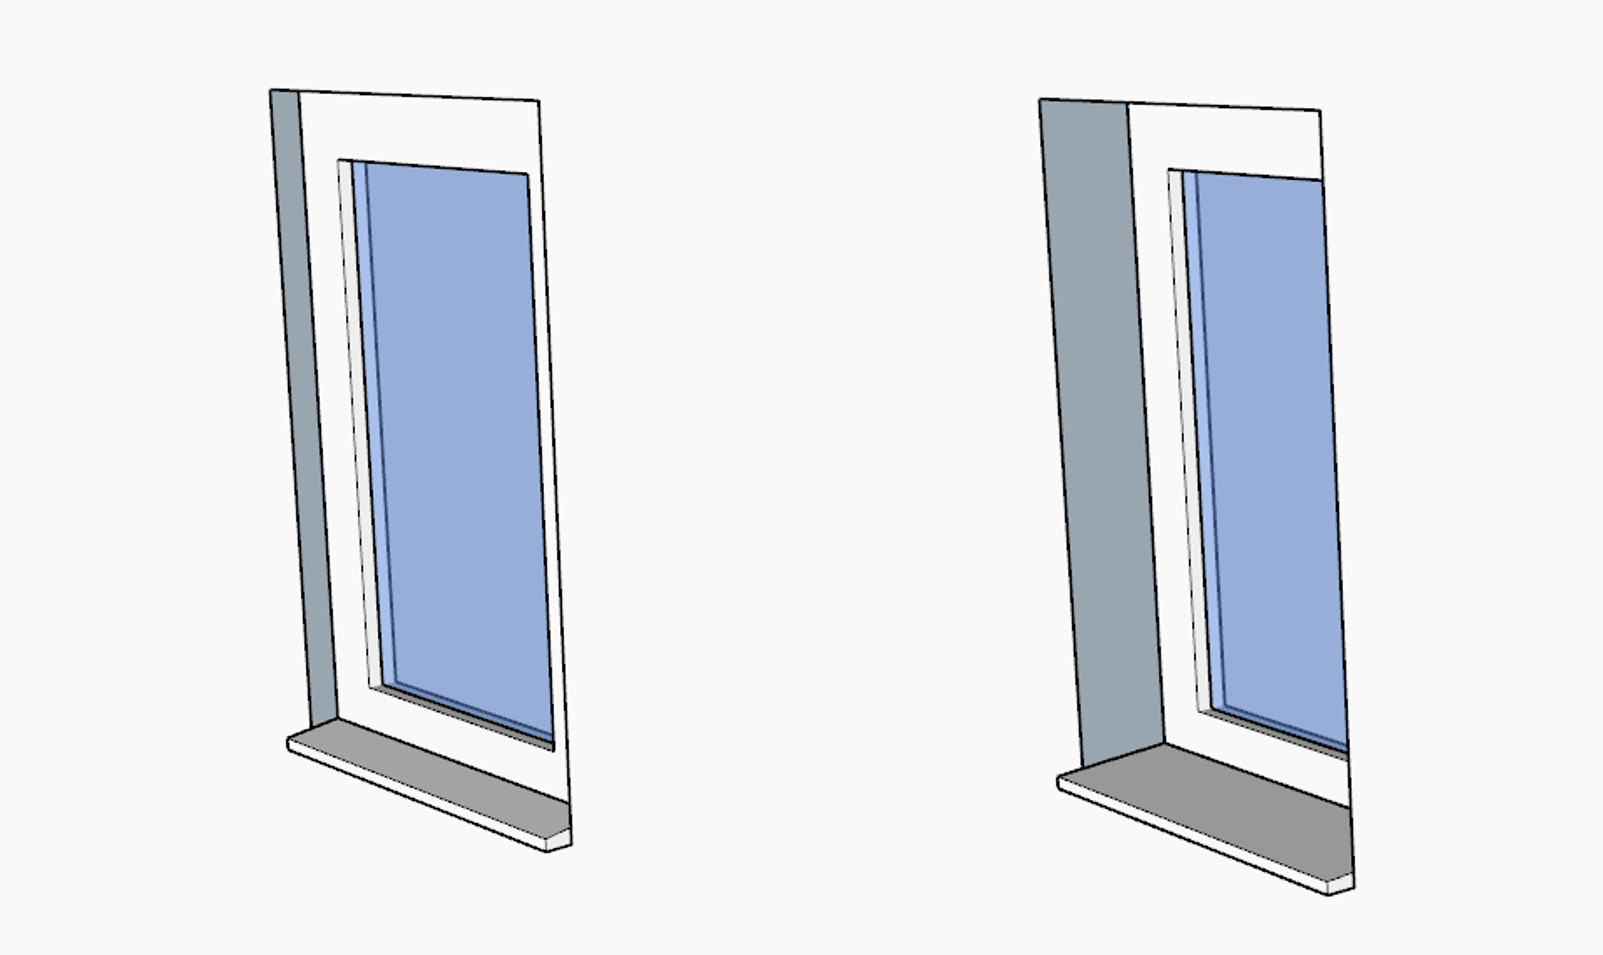
Wonderfully simple but can you spot any potential issues?
Firstly, you might be able to see from the image above, DesignPH assumes that all reveals are the same (not necessarily a bad thing) but it may not be suitable for modelling your design.
Secondly, and maybe more importantly, DesignPH assumes the distance from the glazing edge to the reveal is always the width of the frame. Again, this is not a bad thing, it’s great for keeping the DesignPH software easy to use, but what if you have a splayed reveal?
In these cases, where you may have more complex architectural reveals, don’t just give up on DesignPH, we can use a hybrid approach instead. I would in these cases set the window reveal depth to zero and continue as normal. We can then add in the reveal shading into PHPP which is better equipped at dealing with more complex reveals. Definitely add a note to say that you’re modelling the shading effects of reveals in PHPP as you don’t want to accidentally double count shading, and your certifier will be grateful instead of having to untangle how you’ve gone about modelling it.
Method 2: PHPP
In PHPP the reveal dimensions need to be inputted into the Shading worksheet for each window. You will need to add the dimensions into the correct columns as PHPP splits the lateral reveals (window jambs), typically columns AD and AE, and the top reveal/overhang (window head), typically columns AF and AG.
PHPP wants the data in metres so watch out for those pesky unit conversions, I’ve come a cropper more times than I’d like to admit.
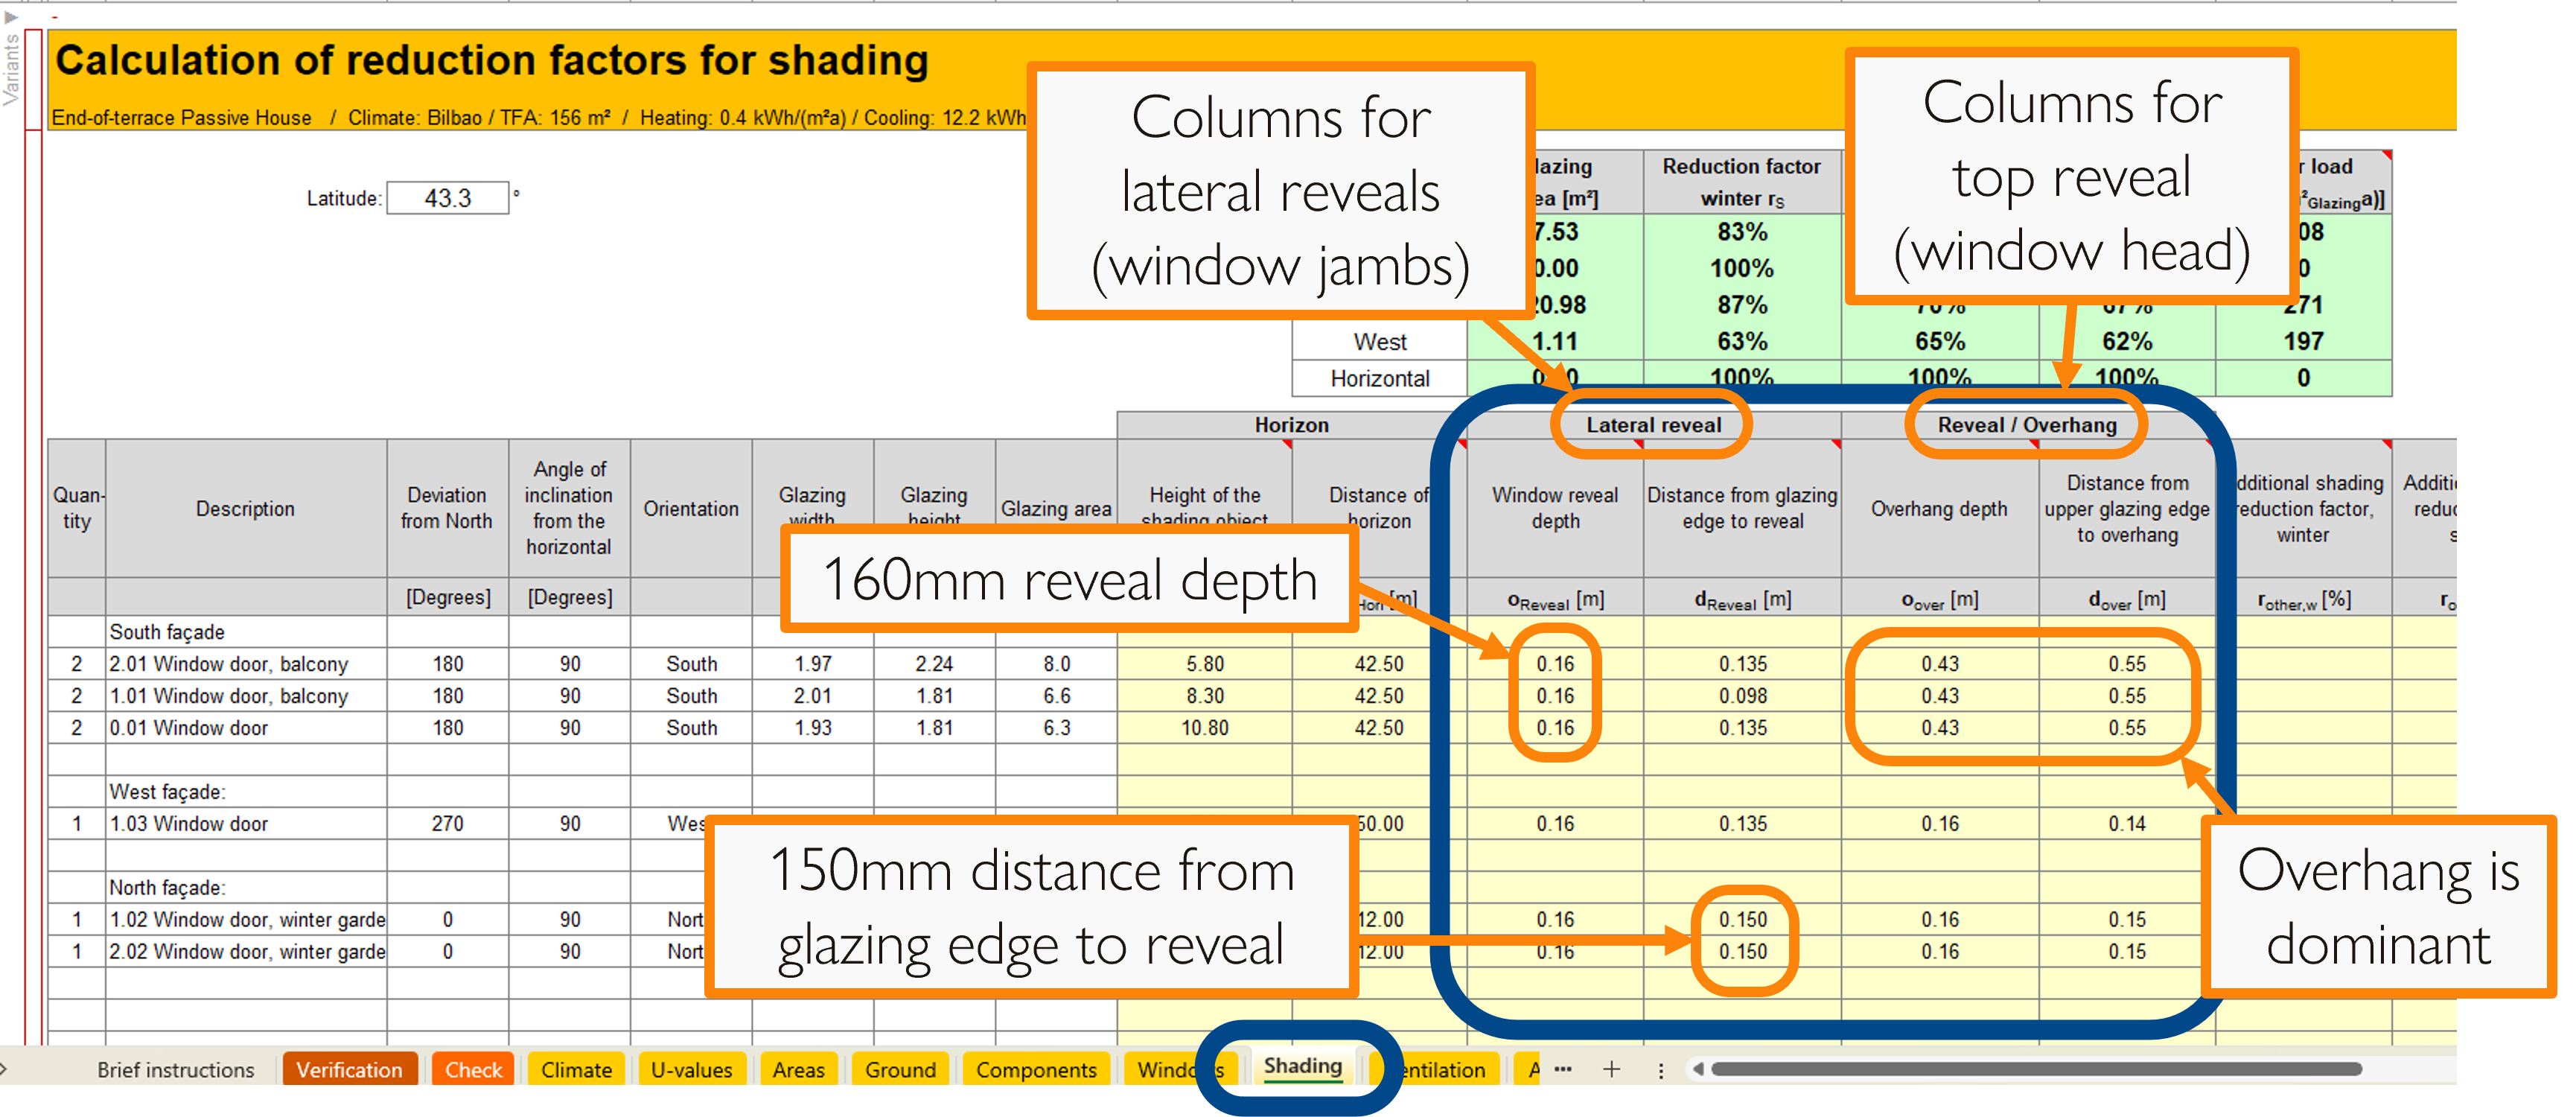
Note: in the Reveal / Overhang columns only model the most dominant shading feature (as we defined in finding the reveal edge). It’s a common mistake to model the wrong one or accidentally add both.
Non-symmetrical reveals
Now this is a very niche case and would apply to the stunning picture at the top of the article. Unless this is a shading device added to the exterior of the building, such as a shading fin that you can easily add to your DesignPH model, you will need to model this in PHPP. You will need to follow the methodology outlined in the PHPP manual, section 20.5.4, ‘Reveal shading on one side’. For the sake of brevity I won’t dig into in the methodology in this article but will save it for another one down the line.

I hope you can now appreciate what a cool little design feature reveals can be. They can be tailored to help your Passivhaus perform better at next to no change in construction cost.
WHY: Well-designed reveals can be used to tailor the solar gains in your design and can help achieve better thermal comfort
WHEN: Typically at technical design unless you have a cooling demand, overheating risk or planning limitations on windows, in which case this is best tackled at concept design
HOW: Measure them from section drawings
WHERE: Either inputting into the Shading worksheet in PHPP or adding to your DesignPH model

Passivhaus Preceptorship bridges the gap between qualification and practice, by guiding and mentoring you through your first Passivhaus projects. If you find this content valuable please help spread the word by sharing.

Keep up to date with all our latest posts by subscribing and have a peruse of all the posts in our archive: