

Lifts (the basics)
How to deal with lifts in your Passivhaus project

The energy consumption of vertical transportation is often overlooked and a bit of a last minute afterthought that gets added to your PHPP when pointed out as missing by your certifier. By fully understanding the impact of lift energy, we can help derisk our Passivhaus design as early as possible to save our clients time, money and stress. Let's explore the quick way to model lift energy.

Vertical transportation is vital part of accessible design. Not everyone is fortunate enough to be able to use a flight of stairs without assistance. Even I would be a bit miffed if I turned up to a meeting on the 6th floor and found out there wasn’t a lift.

Nearly all multi-storey new builds, whether residential or commercial, will have a lift specified somewhere to help make the space usable. But lifts use energy, especially in skyscrapers, and modelling energy accurately is vital to good Passivhaus design.
Accurate energy modelling is important for passing the primary energy renewable (PER) target. The PER target of your Passivhaus will vary depending on the standard you’re targeting but for Passivhaus Classic it’s <60kWh/(m²a).
Lift energy can also affect your internal heat gains (IHG) which has a knock-on effect on the heating and cooling requirements in your building. Missing IHG in cooling-driven buildings can be a costly mistake.

Lifts energy is not a calculation in the standard version of PHPP but it needs to be considered. When modelled correctly, lift energy affects the PER and the IHG calculations in your PHPP model. As such they will need to be included in your final PHPP and can affect how you go about your design.
Lift energy is split into two: standby power and travel demand. Travel demand is complicated to model as it is affected by a variety of different factors from average trip distance to nominal load. However standby power can be just as important if lifts are specified with minimal expected usage.
Let’s dig into how to model lifts in your Passivhaus.

For cold climates
Lift energy is best modelled at the technical design stage. At the early design stages it is more important to focus on the space heating demand or heat load target and nailing the fabric of the building should be a priority.
However, if you have an extremely tall building it may be worth quickly dropping a basic conservative assumption into your PHPP just to check how the building performs with regards to the PER target.
I would recommend excluding the lift energy from the IHG calculations at early stages as it may provide an accidental boost to the space heating and heat load.
For warm climates
In warm climates IHGs are more of a concern as they will actively increase your cooling demand. Any additional energy that turns into heat will need to be removed from the building by the cooling system.
It’s worth checking whether your lift is inside or outside the thermal envelope of your building. If it is outside, lift energy will only affect the PER and we can leave lifts until the technical stage (unless your building is super tall). If it is inside, as most lifts are, IHG comes into play.
In this scenario I would recommend modelling the lift energy using conservative assumptions at an early stage. This will give you a feel for how big of a contributor the lift energy consumption is to the IHG and how much of an effect it has on your space cooling demand.
Typically, the exact lift won’t get specified until technical design but, if it’s coming up as a key contributor, don’t be afraid to push your design team to specify a low energy specification early on. It’s better to get key risk items nailed down as early as possible.

As mentioned PHPP has no calculation for lift energy, however the PHI has released the ‘lift energy demand tool’ to standardise lift energy modelling. The spreadsheet can be downloaded here and I would recommend importing the sheet into your standard PHPP to keep all energy calculations within your working PHPP. It saves you trying to remember where you’ve saved them a few years from now. The results then need linking back into your model, but we’ll come onto that later.
The lift energy demand tool was built back in 2017 when VDI 4707 was the main standard for benchmarking lift energy. Since then, ISO 25745 has replaced it but the tool still refers to VDI 4707. Both standards are a methodology to measure the energy efficiency of lifts and benchmark them on an A-G rating scale.
The tool has three columns to model three different types of lift installation in your Passivhaus. If you run out and need more just make another copy of the lift tool in your PHPP. It’s important that we model lifts outside of the thermal envelope and inside the thermal envelope separately in the lift tool. Both will count towards your PER target, however lifts inside the thermal envelope will also count towards your IHG. So, even if you have the same lift specification, I’d recommend using a separate column for inside and outside the thermal envelope.
The lift tool is roughly split into four sections: geometry, standby demand, travel demand and working load. In this article we’ll focus on quickly modelling a lift using the inbuilt efficiency class dropdowns, but we’ll come onto the more complex modelling in a future article.
Geometry
This data can often be found in a project’s lift specification at early stages, or a manufacturer specific data sheet at technical design. You’ll need to know the number of lifts, nominal load (maximum weight capacity) and nominal speed (maximum speed the lift travels). The lifting height isn’t necessary if you’re not creating a user-defined profile, which we won’t cover in this article.

I’ve added a few examples that you can use at an early stage for your project, but I would recommend using project specific information as soon as it is available.
Standby demand
As mentioned, the energy efficiency rating (A-G) of the lift can be used here to quickly model the standby power of the lift. This data is used to calculate the energy consumption of the lift while it just sits there. For a quick calculation we’re only interested in the top row which requires the energy efficiency class being selected from the dropdown.

Travel demand
It’s the same with travel demand. For a quick lift model, the energy efficiency rating can be selected from the dropdown to give the travel energy demand. This is energy required per kilogram of load per metre of travel.
Working load
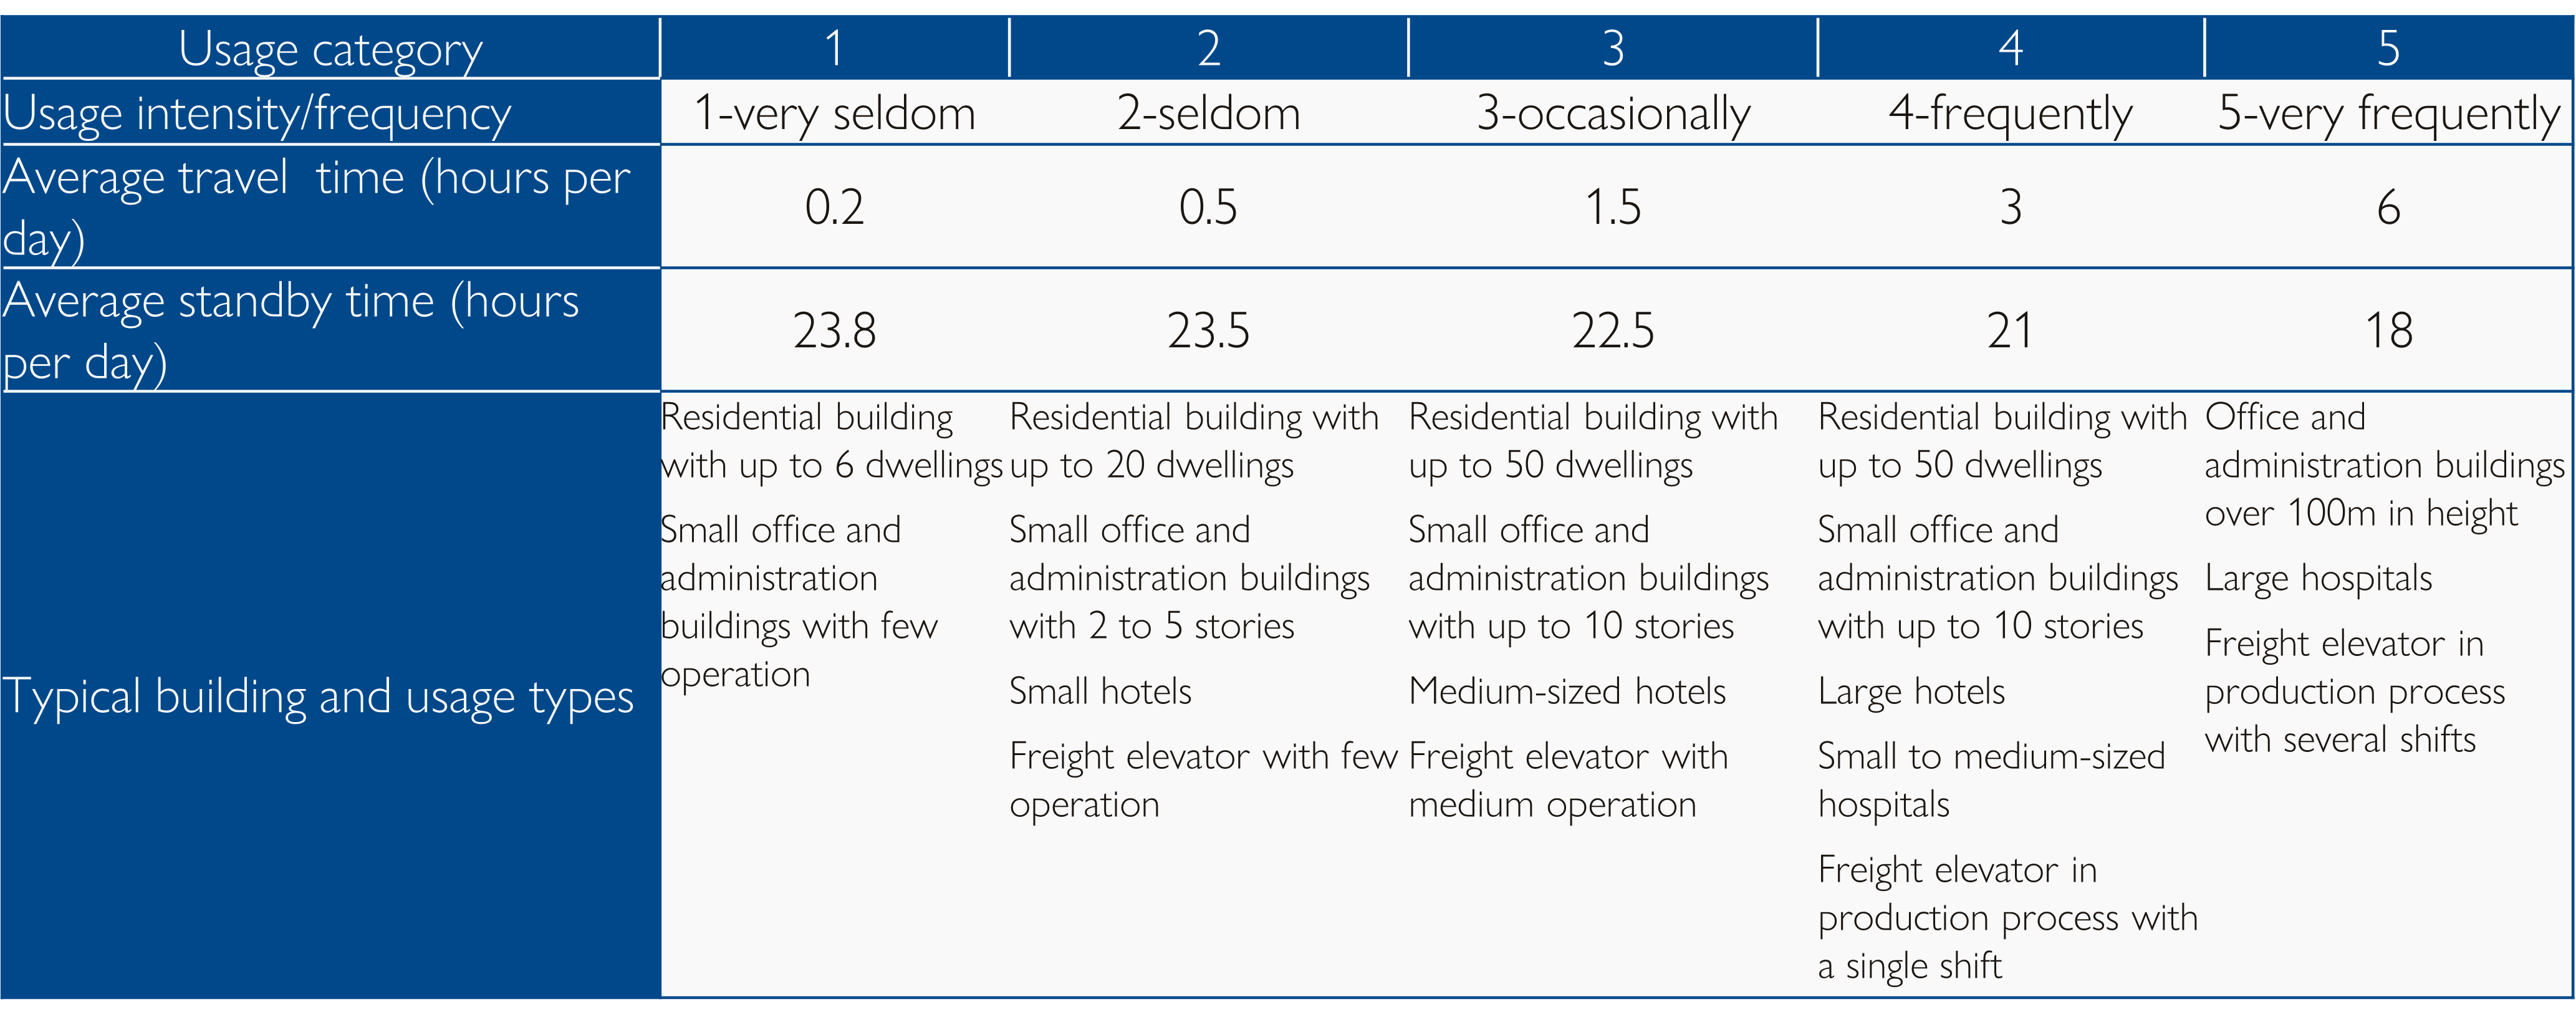
Since we’re going for a simple calculation we can again select from the dropdown for the usage intensity.

The categories here are standard categories created by the PHI to model how often the lift is in use. You can use the ‘typical building and usage types’ row to select a suitable scenario for the lift in your building.
Once you’ve entered the information above for your project, you’ll see the results of the calculations at the bottom of the worksheet. The key number we need to take from this is the ‘total energy demand lifts in total’ row. These are the numbers we want to transfer to the Aux Electricity worksheet in PHPP.
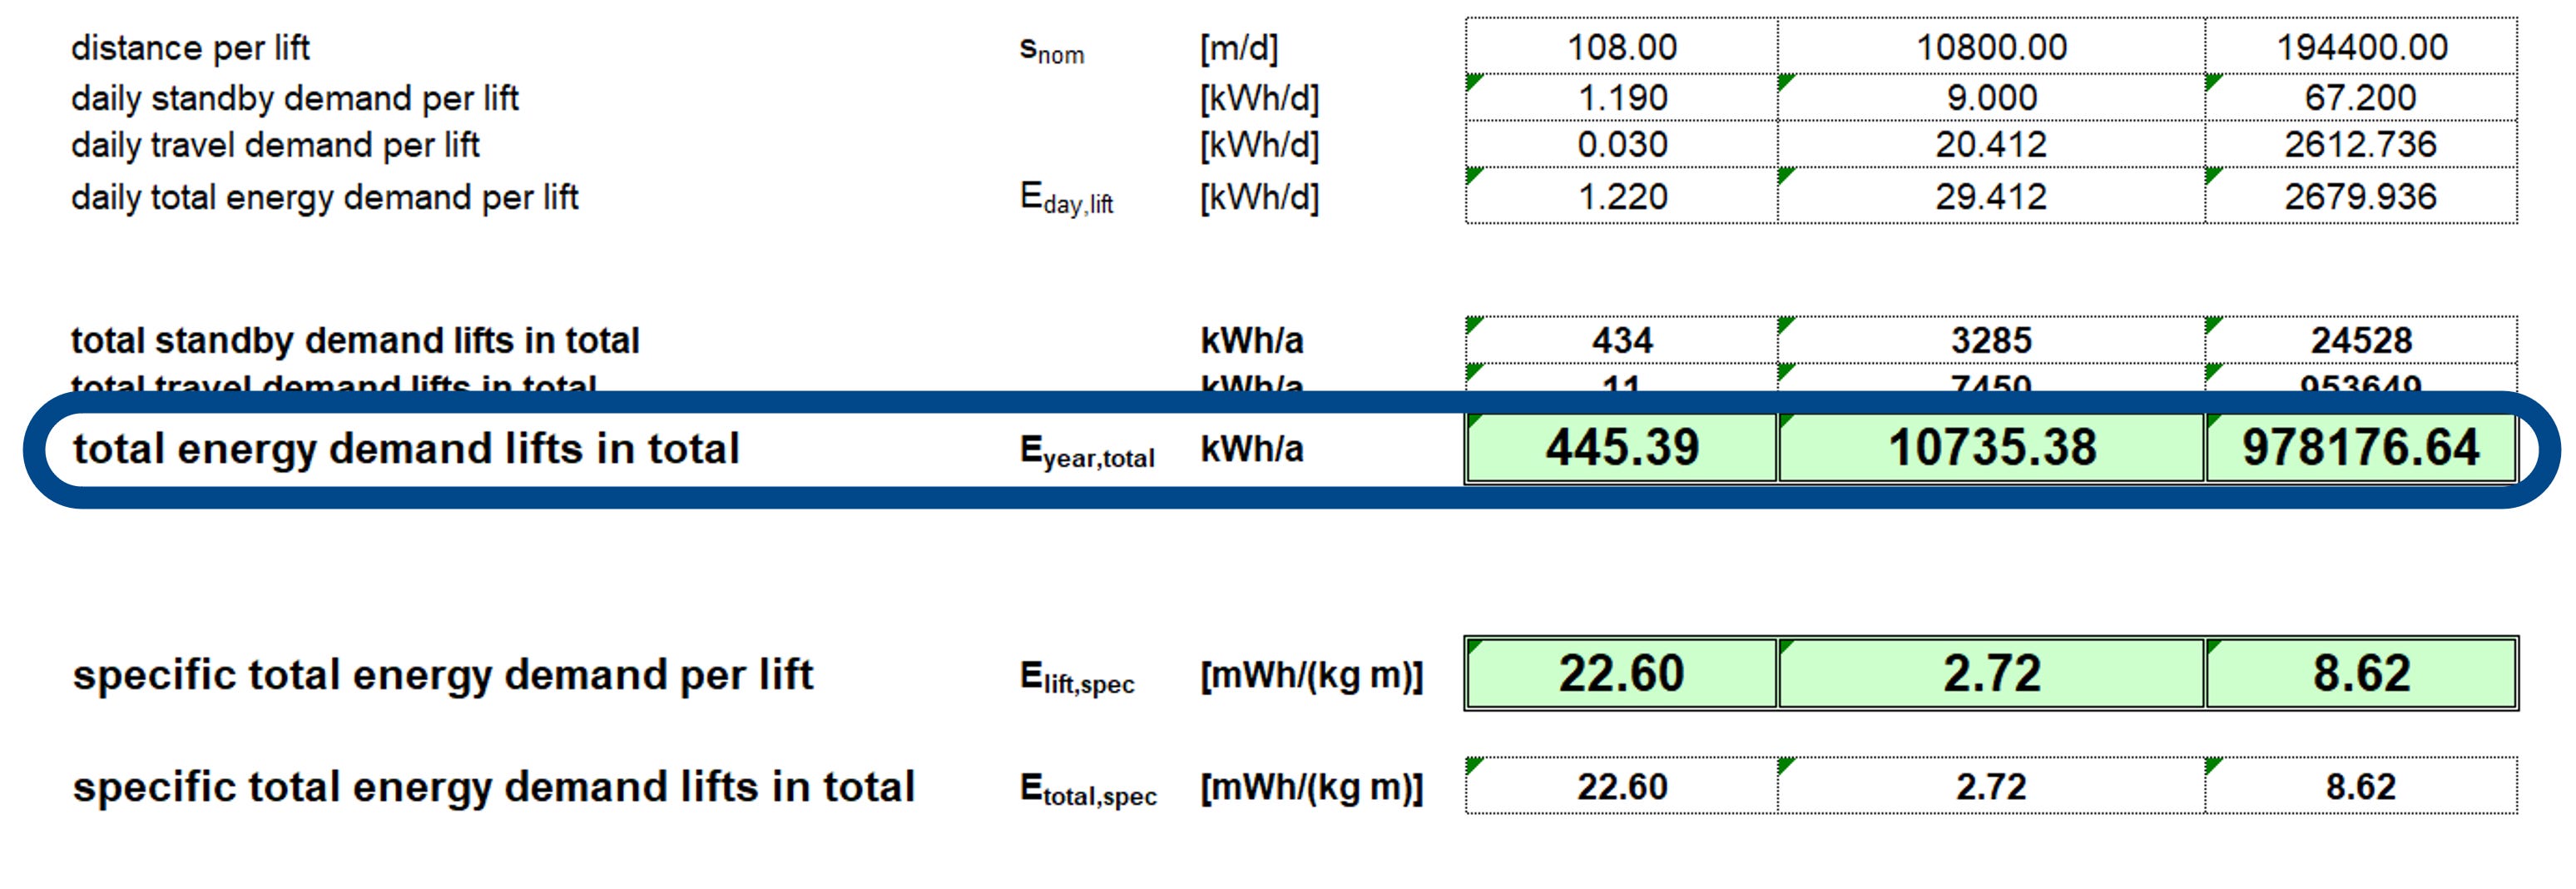
The examples outputs above are two extremes from a very seldom used, A class efficiency lift in a private home on the left, to a very frequently used, G class efficiency lift in a skyscraper on the right. These are extremes so don’t take them as numbers you should use or reference in your PHPP model.

Once you’ve calculated the lift energy it should be added into the Aux Electricity worksheet in your PHPP.
The lift (or elevator) input can be found right down at the bottom of the worksheet, typically in row 73 in a standard PHPP.
If you have imported the lift energy demand tool I’d just link the output cell here, it’ll save any future trouble if you update the lift calculations but forget to overwrite it.
In this example I’ve added an additional row to show you how I would deal with a scenario with a lift inside the thermal envelope and lift outside the thermal envelope in a single building. This would be unusual but worth showing just in case.

Hopefully you now know how to model the lifts in your Passivhaus project using the lift’s energy efficiency rating.
WHY: To correctly account for energy usage and internal heat gains
WHEN: At an early stage in cooling-driven buildings where the lift is inside the thermal envelope or in skyscrapers, otherwise during technical design
HOW: Using the lift energy demand tool
WHERE: Enter the lift energy consumption data in the Aux Electricity worksheet

Passivhaus Preceptorship bridges the gap between qualification and practice, by guiding and mentoring you, step-by-step, through the process of designing a Passivhaus.

With overheating becoming an increasingly challenging concern it’s important to consider how to mitigate those risks, and this is something that Passivhaus can help to design out.
Read our article about the temporary shading factor in the Shading worksheet, which explains how to model temporary shading solutions (e.g. external blinds) to optimise their design and reduce unwanted solar gains in summer to mitigate overheating.